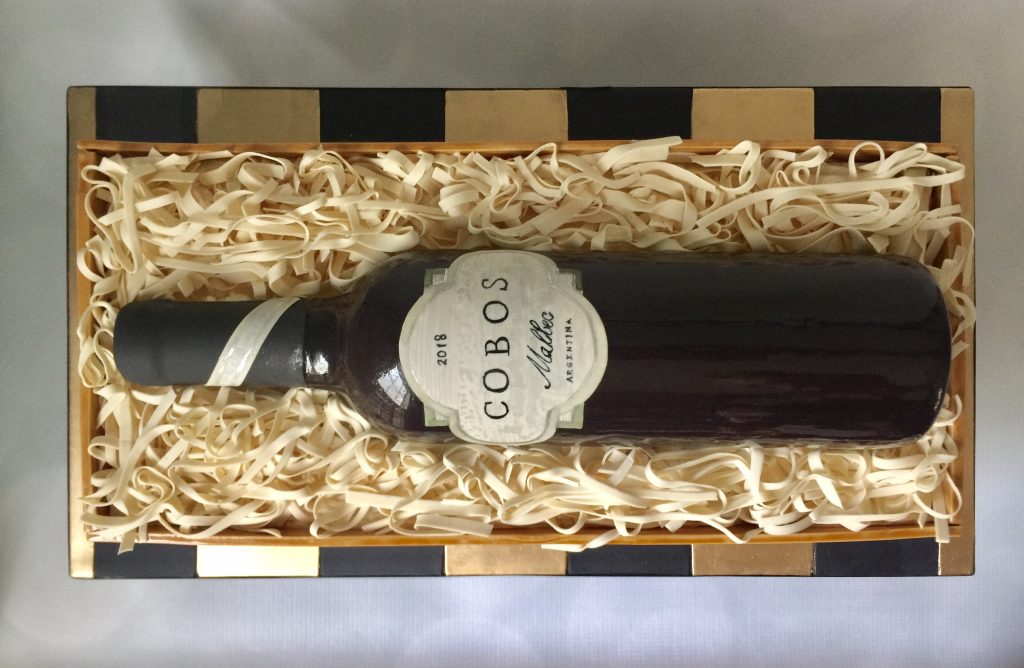
This wine crate cake is such a fun and impressive design! And I promise, it’s much easier than it looks. It takes some time, so the thing to do is spread things out over several days. If you’ve got a wine lover in your life, this is a no brainer…they will love it!
If you want to do a cake board like the one shown, it needs to dry overnight so allow time for that…I put instructions at the end of this post.
this video shows the process:

You’ll need:
- a wine bottle in your desired shape, to use as a mold
- a rectangular cake longer and wider than your wine bottle (mine is 14”x7”), crumb coated
- one 8” layer of cake and some buttercream, to fill the wine bottle shape
- black fondant
- a bit of fondant in whatever color you’re doing your label
- straw colored fondant for the crate and excelsior
- rolling pin
- quilting ruler
- dresden tool
- fondant smoother
- pizza cutter
- scalpel or x-acto knife


The best way I’ve found to keep the bottle from rolling around is to wedge a little ball of fondant against each side. Roll out the black fondant large enough to cover the bottle. Flip it over and *generously* dust with cornstarch. Get a really good layer on there! Dust the bottle as well.


Flipping it back over, lay it over the bottle and run your hands over it to shape it to the bottle.


Take your time over this step. Carefully run your scalpel around the bottle, about half way up. You want to keep the cut as level as you can. Carefully give the fondant a little jiggle, to make sure it will shift. If it won’t, there’s no point in letting it dry so start over and use even more cornstarch! Please don’t ask me how I know this ;).
the foil


Roll out a bit of black fondant as thin as possible. Brush water over the neck of the bottle. Cut a straight edge on one end of your piece of fondant, and lay over the neck to look like the foil. Trim along the same line as the bottle. The brand I was mimicking has some white labeling on the neck so I added that at this point.
the label


Print out a copy of the label you’re using, as close as life sized as possible. Carefully cut it out, and trace around it on cardstock. Use that to cut the shape out from thin fondant. Lay the printed label over the cut out fondant, lining up the edges. With your dresden tool, run over the lines in the label you want to replicate, firmly enough to imprint the fondant. Using the imprinted lines as guides, paint the label with food color thinned with vodka or everclear. While the label is still pliable, attach to the bottle with a bit of water, centering it carefully.
If you don’t feel like painting, or you want it to be totally perfect, you can do an edible image! I go to my favorite local cake store for that (if you are in Orlando, Annette’s is awesome! They also have an Etsy shop for mail order). If your town doesn’t have a cake supply store there are some online sources. I’ve heard of people going to a grocery store bakery for custom images but I had no luck when I tried that.
Let the bottle dry for two days if you can. The first time I did this design I took the fondant bottle off the real bottle when it seemed dry, thinking circulation would help it dry thoroughly. It started collapsing after about an hour and I was able to save it by getting it back onto the real bottle. Now I just leave them be until I have the cake done, so there is always support.
the cake for the bottle


Cut rounds of cake a bit smaller than the diameter of your bottle, and trim about a third off of them.


Sandwich them together with buttercream, and lay the wine bottle over to see how the fit is. Frost with buttercream, making sure the whole space inside the bottle is filled…you want it to be solid, to support the fondant. Stash it in the fridge while you work on the crate.
the crate panels


Measure your cake, and roll out fondant for the side panels. I tend to roll out enough for two sides (the ends together, the long sides together) at a time. Make wood grain marks with a dresden tool, and measure out your panels with a clear quilting ruler. You want them to be about 1/4” taller than the cake, and make them about half an inch longer, because you will be trimming one end of each.


Lay them aside where they can dry (I put them on 1/2 sheet cake boards so I can move them around easily). Push the edge of the ruler against each panel, to make sure everything is straight as it sets up.


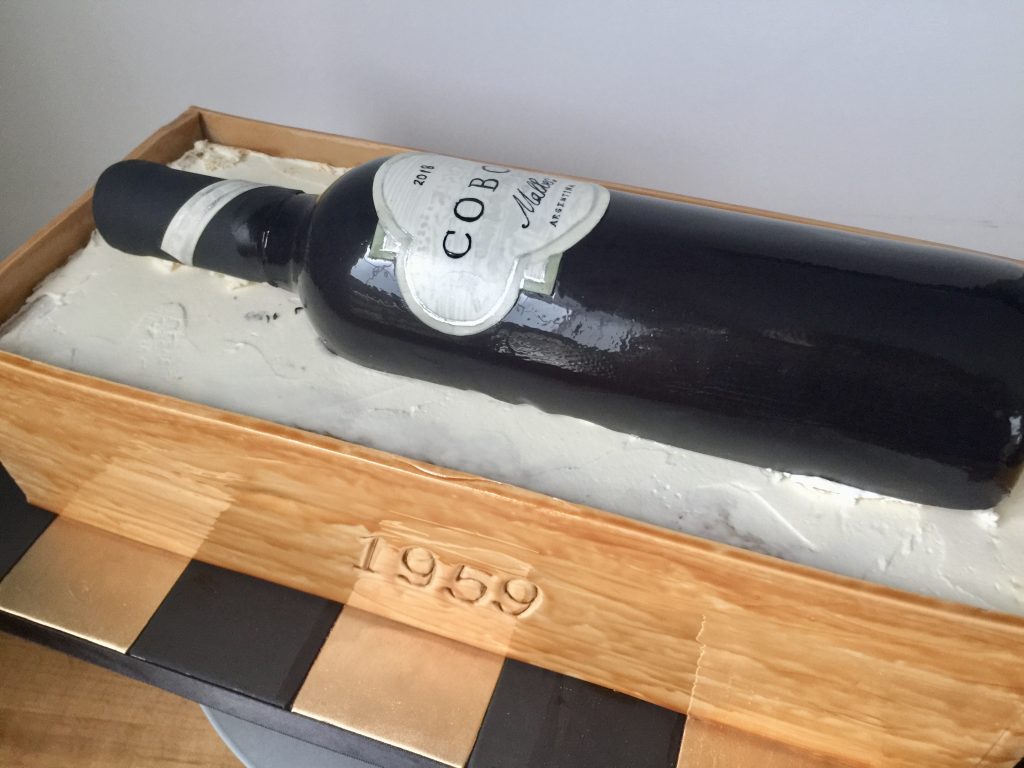
I think the birth year is a cute touch (or you can do initials)…just print it in the size you’d like it to be and lay it over one of the long panels. Run a dresden tool over the paper to imprint onto the fondant. Remove the paper and carefully deepen the lines.
assembly


Once your panels have dried a bit, they should be much easier to handle without becoming misshapen. How long that takes depends on humidity mostly, but they should be good to go in about 30 minutes. I find the best way to stick them to the cake is with a thin coating of buttercream. Just spread a bit on and lay a panel against the cake, lining one end up, with the extra at the other end. Continue around, trimming the end of each side as you go. Finish with the front, so the seams are on the sides.


To varnish the box, mix up a bit of brown gel coloring with vodka or everclear and brush on (a pastry brush is perfect for this).

Lay the bottle on top. I think giving the bottle some shine is critical to make it feel real, and luckily that’s super simple. Just mix up equal parts of corn syrup and vodka or everclear and brush that on, carefully going around the label. Also I think it’s a subtle but effective touch to keep the foil matte. Almost done!
I always think the packing material is going to take forever but it goes faster than I think every time. Just roll out some very pale beige fondant quite thinly, and cut strips as narrow as you can without going crazy ;). Gently pick up a few strands at a time and arrange them between the bottle and the crate. The main challenge is avoiding the bottle, which is sticky- try and lay the strands down away from the bottle, and push them towards it to fill in the gaps. I always get some on the bottle though and just peel them off- you can touch the glaze up when you’re done if need be.

gold and black striped board
Doing a disposable board can be great especially for odd-shaped cakes like this one- you might not have a platter that works so this is a great solution. Plus it looks so cool!


Roll out black fondant big enough to cover your board (here I’m using a half sheet board- actually two I glue together for extra strength). Moisten the board (I use a damp kitchen towel) and lay the fondant over the board. Trim the edges with a paring knife.
With a quilting ruler, measure your stripes and run lines with a dresden tool. Let dry overnight.
For each gold stripe, lay painter’s tape along each edge, pressing firmly.

Mix up gold dust and vodka or everclear…you’re looking for the texture of heavy cream. If you’ve ever used painter’s tape on a wall, this is the same idea- you want to brush away from the tape, not towards it (so the paint isn’t pushed underneath).


Once it’s dry, slowly pull the tape off. Trim the edges of the board with ribbon (a glue stick works perfectly), and that’s it!
I hope you give this wine crate cake a go! Get in touch with any questions, and I’d love to see your photos!
Happy baking!!


Hello Robyn!
I love this cake!! I’m thinking of attempting it, but I have a few questions. I always hear never to refrigerate fondant, but I see you’re do it to the bottle once you fill it with cake. How long would you leave it? Can this be done in advance of a day or so? I assume the bottle shape is to be removed and not eaten or do you just cut that as the fondant got soft on the buttercream? I’ve seen a few other make the crate walls out of gum paste, and dry for a few days. I have no idea how they plan to cut the cake after, maybe just remove a wall before cutting. I see yours are fondant, so they just get cut easily? Thanks so much. I’m most curious about the effects and time it can be refrigerated (the bottle filled with cake and the entire finished cake once done.thank you so much
Hi! A sharp knife will go through the fondant panels with no problem. Refrigerating fondant can be tricky but really just depends on how humid your fridge is. I’ve had one that I could not keep a cake in overnight and one that I can. Unfortunately it’s a matter of trial and error- a more humid fridge can work if you box up the cake and wrap well in Saran but I’d give that a test before trying it on anything you’ve put a lot of time in to! Good luck!